@Bean public RestTemplate restTemplate() { SimpleClientHttpRequestFactoryfactory=newSimpleClientHttpRequestFactory(); // Time to establish a connection to the server from the client-side. Set to 20s. factory.setConnectTimeout(20000); // Time to finish reading data from the socket. Set to 300s. factory.setReadTimeout(300000); returnnewRestTemplate(factory); }
JavaScript HTTP Client
axios
Default Timeout
The default timeout is 0 (no timeout).
Settings
const instance = axios.create({
    baseURL: 'https://some-domain.com/api/',
    // `timeout` specifies the number of milliseconds before the request times out.
    // If the request takes longer than `timeout`, the request will be aborted.
    timeout: 60000,
    ...
});
E-commerce: Websites that facilitate online buying and selling of goods and services, such as Amazon or eBay.
Shopping mall
Social Networking: Websites that connect people and allow them to interact and share information, such as Facebook or LinkedIn.
IM
Forum/BBS
News and Media: Websites that provide news articles, videos, and other multimedia content, such as CNN or BBC.
Blogs and Personal Websites: Websites where individuals or organizations publish articles and personal opinions, such as WordPress or Blogger.
Educational: Websites that provide information, resources, and learning materials for educational purposes, such as Khan Academy or Coursera.
Entertainment: Websites that offer various forms of entertainment, such as games, videos, music, or movies, such as Netflix or YouTube.
Government and Nonprofit: Websites belonging to government institutions or nonprofit organizations, providing information, services, and resources, such as whitehouse.gov or Red Cross.
Business and Corporate: Websites representing businesses and corporations, providing information about products, services, and company details, such as Apple or Coca-Cola.
Sports: Websites dedicated to sports news, scores, analysis, and related information, such as ESPN or NBA.
Travel and Tourism: Websites that provide information and services related to travel planning, accommodations, and tourist attractions, such as TripAdvisor or Booking.com.
Mobile Software
Desktop Software
Instant message. E.g. Telegram.
Email client. E.g. Mozilla Thunderbird.
Web browser. E.g. Google Chrome.
Office software. E.g. Microsoft Office, Typora, XMind.
Note-taking software. E.g. Notion, Evernote.
PDF reader. E.g. SumatraPDF.
File processing. E.g. 7-Zip
Media player. E.g. VLC.
Media processing. E.g. FFmpeg, HandBrake, GIMP.
Flashcard app. E.g. anki.
Stream Media. E.g. Spotify.
HTTP proxy. E.g. V2rayN.
Libraries, Tools, Services
Libraries
General-purpose libraries for programming language. E.g. Apache Commons Lang.
File processing. E.g. Apache POI.
Data parser. E.g. org.json.
Chart, Report, Graph.
Logging.
Testing.
HTTP Client.
Developer Tools
Editor
IDE
Service Client.
Services
Web servers. E.g. Nginx, Apache Tomcat.
Databases. E.g. MySQL.
Cache. E.g. Redis.
Search engines. E.g. Elasticsearch.
Deliver software / contioner. E.g. Docker.
Other services. E.g. Gotenberg, Aliyun services (media, ai).
Apache PDFBox is a Java tool for working with PDF documents. In this post, I will introduce how to use Apache PDFBox to handle PDF files. The code examples in this post are based on pdfbox v2.0.29.
StringinputFilePath="your/pdf/filepath"; // Load PDF document PDDocumentdocument= PDDocument.load(newFile(inputFilePath)); // Create PDFTextStripper instance PDFTextStripperpdfStripper=newPDFTextStripper(); // Extract text from PDF Stringtext= pdfStripper.getText(document); // Print extracted text System.out.println(text); // Close the document document.close();
Extract page by page
StringinputFilePath="your/pdf/filepath"; // Load the PDF document PDDocumentdocument= PDDocument.load(newFile(inputFilePath)); // Create an instance of PDFTextStripper PDFTextStripperstripper=newPDFTextStripper(); // Iterate through each page and extract the text for (intpageNumber=1; pageNumber <= document.getNumberOfPages(); pageNumber++) { stripper.setStartPage(pageNumber); stripper.setEndPage(pageNumber);
Stringtext= stripper.getText(document); System.out.println("Page " + pageNumber + ":"); System.out.println(text); } // Close the PDF document document.close();
Split and Merge
Split
privatestaticvoidsplitPdf(String inputFilePath, String outputDir)throws IOException { Filefile=newFile(inputFilePath); // Load the PDF document PDDocumentdocument= PDDocument.load(file); // Create a PDF splitter object Splittersplitter=newSplitter(); // Split the document List<PDDocument> splitDocuments = splitter.split(document); // Get an iterator for the split documents Iterator<PDDocument> iterator = splitDocuments.iterator(); // Iterate through the split documents and save them inti=1; while (iterator.hasNext()) { PDDocumentsplitDocument= iterator.next(); StringoutputFilePath=newStringBuilder().append(outputDir) .append(File.separator) .append(file.getName().replaceAll("[.](pdf|PDF)", "")) .append("_split_") .append(i) .append(".pdf") .toString(); splitDocument.save(outputFilePath); splitDocument.close(); i++; } // Close the source document document.close(); System.out.println("PDF split successfully!"); }
Merge PDF files
privatestaticvoidmergePdfFiles(List<String> inputFilePaths, String outputFilePath)throws IOException { PDFMergerUtilitymerger=newPDFMergerUtility(); // Add as many files as you need for (String inputFilePath : inputFilePaths) { merger.addSource(newFile(inputFilePath)); } merger.setDestinationFileName(outputFilePath); merger.mergeDocuments(); System.out.println("PDF files merged successfully!"); }
Insert and remove pages
Insert pages
publicstaticvoidinsertPage(String sourceFile, String targetFile, int pageIndex)throws IOException { // Load the existing PDF document PDDocumentsourceDoc= PDDocument.load(newFile(sourceFile)); IntegersourcePageCount= sourceDoc.getNumberOfPages(); // Validate the requested page index if (pageIndex < 0 || pageIndex > sourcePageCount) { thrownewIllegalArgumentException("Invalid page index"); } // Create a new blank page PDPagenewPage=newPDPage(); // Insert the new page at the requested index if (sourcePageCount.equals(pageIndex)) { sourceDoc.getPages().add(newPage); } else { sourceDoc.getPages().insertBefore(newPage, sourceDoc.getPages().get(pageIndex)); } // Save the modified PDF document to a target file sourceDoc.save(targetFile); // Close the source and target documents sourceDoc.close(); }
Remove pages
privatestaticvoidremovePage(String inputFilePath, String outputFilePath, int pageIndex)throws IOException {
PDDocumentsourceDoc= PDDocument.load(newFile(inputFilePath)); IntegersourcePageCount= sourceDoc.getNumberOfPages(); // Validate the requested page index if (pageIndex < 0 || pageIndex >= sourcePageCount) { thrownewIllegalArgumentException("Invalid page index"); } sourceDoc.getPages().remove(pageIndex); sourceDoc.save(outputFilePath); sourceDoc.close(); }
privatestaticvoidremovePage2(String inputFilePath, String outputFilePath, int pageIndex)throws IOException { PDDocumentsourceDoc= PDDocument.load(newFile(inputFilePath)); IntegersourcePageCount= sourceDoc.getNumberOfPages(); // Validate the requested page index if (pageIndex < 0 || pageIndex >= sourcePageCount) { thrownewIllegalArgumentException("Invalid page index"); } Splittersplitter=newSplitter(); List<PDDocument> pages = splitter.split(sourceDoc); pages.remove(pageIndex); PDDocumentoutputDocument=newPDDocument(); for (PDDocument page : pages) { outputDocument.addPage(page.getPage(0)); } outputDocument.save(outputFilePath); sourceDoc.close(); outputDocument.close(); }
AccessPermissionap=newAccessPermission(); // disable printing, ap.setCanPrint(false); //disable copying ap.setCanExtractContent(false); //Disable other things if needed...
// Owner password (to open the file with all permissions) // User password (to open the file but with restricted permissions) StandardProtectionPolicyspp=newStandardProtectionPolicy(password, password, ap); // Define the length of the encryption key. // Possible values are 40, 128 or 256. intkeyLength=256; spp.setEncryptionKeyLength(keyLength);
AccessPermissionap=newAccessPermission(); // disable printing, ap.setCanPrint(false); //disable copying ap.setCanExtractContent(false); //Disable other things if needed...
// Owner password (to open the file with all permissions) // User password (to open the file but with restricted permissions) StandardProtectionPolicyspp=newStandardProtectionPolicy(newPassword, newPassword, ap); // Define the length of the encryption key. // Possible values are 40, 128 or 256. intkeyLength=256; spp.setEncryptionKeyLength(keyLength);
//Apply protection doc.protect(spp);
doc.save(outputFilePath); doc.close(); }
Remove password
publicstaticvoidremovePdfPassword(String inputFilePath, String outputFilePath, String password)throws IOException { PDDocumentdoc= PDDocument.load(newFile(inputFilePath), password); // Set the document access permissions doc.setAllSecurityToBeRemoved(true); // Save the unprotected PDF document doc.save(outputFilePath); // Close the document doc.close(); }
Convert to Image
PDF to Image
publicstaticvoidpdfToImage(String pdfFilePath, String imageFileDir)throws IOException { Filefile=newFile(pdfFilePath); PDDocumentdocument= PDDocument.load(file); // Create PDFRenderer object to render each page as an image PDFRendererpdfRenderer=newPDFRenderer(document); // Iterate over all the pages and convert each page to an image for (intpageIndex=0; pageIndex < document.getNumberOfPages(); pageIndex++) { // Render the page as an image // 100 DPI: general-quality // 300 DPI: high-quality // 600 DPI: pristine-quality BufferedImageimage= pdfRenderer.renderImageWithDPI(pageIndex, 300); // Save the image to a file StringimageFilePath=newStringBuilder() .append(imageFileDir) .append(File.separator) .append(file.getName().replaceAll("[.](pdf|PDF)", "")) .append("_") .append(pageIndex + 1) .append(".png") .toString(); ImageIO.write(image, "PNG", newFile(imageFilePath)); } // Close the document document.close(); }
Image to PDF
privatestaticvoidimageToPdf(String imagePath, String pdfPath)throws IOException { try (PDDocumentdoc=newPDDocument()) { PDPagepage=newPDPage(); doc.addPage(page); // createFromFile is the easiest way with an image file // if you already have the image in a BufferedImage, // call LosslessFactory.createFromImage() instead PDImageXObjectpdImage= PDImageXObject.createFromFile(imagePath, doc); // draw the image at full size at (x=0, y=0) try (PDPageContentStreamcontents=newPDPageContentStream(doc, page)) { // to draw the image at PDF width intscaledWidth=600; if (pdImage.getWidth() < 600) { scaledWidth = pdImage.getWidth(); } contents.drawImage(pdImage, 0, 0, scaledWidth, pdImage.getHeight() * scaledWidth / pdImage.getWidth()); } doc.save(pdfPath); } }
Create PDFs
StringoutputFilePath="output/pdf/filepath";
PDDocumentdocument=newPDDocument(); PDPagepage=newPDPage(PDRectangle.A4); document.addPage(page); // Create content stream to draw on the page PDPageContentStreamcontentStream=newPDPageContentStream(document, page); contentStream.setFont(PDType1Font.HELVETICA, 12); // Insert text contentStream.beginText(); contentStream.newLineAtOffset(100, 700); contentStream.showText("Hello, World!"); contentStream.endText(); // Load the image StringimageFilePath="C:\\Users\\Taogen\\Pictures\\icon.jpg"; PDImageXObjectimage= PDImageXObject.createFromFile(imageFilePath, document); // Set the scale and position of the image on the page floatscale=0.5f; // adjust the scale as needed floatx=100; // x-coordinate of the image floaty=500; // y-coordinate of the image // Draw the image on the page contentStream.drawImage(image, x, y, image.getWidth() * scale, image.getHeight() * scale); contentStream.close(); document.save(outputFilePath); document.close();
apt-get is a command line tool for interacting with the Advanced Package Tool (APT) library (a package management system for Linux distributions). It allows you to search for, install, manage, update, and remove software.
Configuration of the APT system repositories is stored in the /etc/apt/sources.list file and the /etc/apt/sources.list.d directory. You can add additional repositories in a separate file in the /etc/apt/sources.list.d directory, for example, redis.list, docker.list.
dpkg
dpkg is a package manager for Debian-based systems. It can install, remove, and build packages, but unlike other package management systems, it cannot automatically download and install packages – or their dependencies. APT and Aptitude are newer, and layer additional features on top of dpkg.
YUM is the primary package management tool for installing, updating, removing, and managing software packages in Red Hat Enterprise Linux. YUM performs dependency resolution when installing, updating, and removing software packages. YUM can manage packages from installed repositories in the system or from .rpm packages. The main configuration file for YUM is at /etc/yum.conf, and all the repos are at /etc/yum.repos.d.
# add repos config to /etc/yum.repos.d
...
# clear repo cache
yum clean all
# create repo cache
yum makecache
# search package
yum search {package_name}

# upgrade package
yum update

# install package
yum install {package_name}

# uninstall package
yum remove {package_name}
RPM (RPM Package Manager)
RPM is a popular package management tool in Red Hat Enterprise Linux-based distros. Using RPM, you can install, uninstall, and query individual software packages. Still, it cannot manage dependency resolution like YUM. RPM does provide you useful output, including a list of required packages. An RPM package consists of an archive of files and metadata. Metadata includes helper scripts, file attributes, and information about packages.
Headless is the same version than the latter without the support of keyboard, mouse and display systems. Hence it has less dependencies and it makes it more suitable for server application.
Debian/Ubuntu/Deepin
Install openjdk from Official APT Repositories
Supported Operating Systems
Ubuntu/Debian
Deepin
Installing
# insall
sudo apt-get install openjdk-8-jdk
# verify. If the installation was successful, you can see the Java version.
java -version
# Update the environment. Make sure that we are working with the most up to date environment possible in terms of our packages
sudo yum update -y
# install
sudo yum install -y python3
# verify
python3 -V
# Add the EPEL repository, and update YUM to confirm your change
sudo yum install epel-release
sudo yum update
# install
sudo yum install nodejs
# verify
node --version
Redis
Linux
Install from Snapcraft
The Snapcraft store provides Redis packages that can be installed on platforms that support snap. Snap is supported and available on most major Linux distributions.
sudo snap install redis
If your Linux does not currently have snap installed, install it using the instructions described in Installing snapd.
Add the EPEL repository, and update YUM to confirm your change:
sudo yum install epel-release
sudo yum update
Install Redis:
sudo yum install redis
Start Redis:
sudo systemctl start redis
Optional: To automatically start Redis on boot:
sudo systemctl enable redis
Verify the Installation
Verify that Redis is running with redis-cli:
redis-cli ping
If Redis is running, it will return:
PONG
Windows
Redis is not officially supported on Windows.
Install from Source
Supported Operating Systems
All Linux distros (distributions)
MacOS
You can compile and install Redis from source on variety of platforms and operating systems including Linux and macOS. Redis has no dependencies other than a C compiler and libc.
# Download source files
wget https://download.redis.io/redis-stable.tar.gz
# Compiling
tar -xzvf redis-stable.tar.gz
cd redis-stable
make
# make sure the build is correct
make test
If the compile succeeds, you’ll find several Redis binaries in the src directory, including:
redis-server: the Redis Server itself
redis-cli is the command line interface utility to talk with Redis.
Starting and stopping Redis
cd redis-stable
# starting redis server
./src/redis-server &
# starting redis server with config
./src/redis-server redis.conf &
# stopping redis server
ps -ef | grep redis-server | awk '{print $2}' | head -1 | xargs kill -9
# connect to redis
./src/redis-cli
# auth
127.0.0.1:6379> auth YOUR_PASSWORD
update password in redis.conf
# requirepass foobared
to
requirepass YOUR_STRONG_PASSWORD
Manage Redis service using systemd
Create the /etc/systemd/system/redis.service file, and add the following line to the file
# Create a mysql User and Group groupadd mysql useradd -r -g mysql -s /bin/false mysql
# Obtain and Unpack the Distribution cd /usr/local tar zxvf /path/to/mysql-VERSION-OS.tar.gz # This enables you to refer more easily to it as /usr/local/mysql. ln -s full-path-to-mysql-VERSION-OS mysql # add the `/usr/local/mysql/bin` directory to your `PATH` variable cp /etc/profile /etc/profile.bak.$(date'+%Y-%m-%d_%H-%M-%S') echo'export PATH=$PATH:/usr/local/mysql/bin' >> /etc/profile cat /etc/profile source /etc/profile
# Creating a Safe Directory For Import and Export Operations cd /usr/local/mysql mkdir mysql-files chown mysql:mysql mysql-files chmod 750 mysql-files
# Initialize the data directory. bin/mysqld --initialize --user=mysql # A temporary password is generated for root@localhost: Trbgylojs1!w bin/mysql_ssl_rsa_setup
# Start mysql server bin/mysqld_safe --user=mysql &
# Next command is optional cp support-files/mysql.server /etc/init.d/mysql.server
Note: This procedure assumes that you have root (administrator) access to your system. Alternatively, you can prefix each command using the sudo (Linux) or pfexec (Solaris) command.
Managing MySQL Server with systemd
Create a user for remote access
Enable MySQL server port in the firewall
If the firewall management on Linux uses ufw, you can run the following command to enable MySQL server port.
ufw allow 3306/tcp
Update bind-address in /etc/my.cnf
Change 127.0.0.1 to Local IP like 192.168.1.100
bind-address=192.168.1.100
Create a MySQL user for remote login
mysql> SELECT user,authentication_string,plugin,host FROM mysql.user;
mysql> CREATE USER 'root'@'%' IDENTIFIED BY 'password';
mysql> GRANT ALL PRIVILEGES ON *.* TO 'root'@'%' WITH GRANT OPTION;
mysql> FLUSH PRIVILEGES;
mysql> SELECT user,authentication_string,plugin,host FROM mysql.user;
Verify
Connect the remote MySQL server from your local computer
# testing the port is open
$ telnet {server_ip} 3306
# test MySQL connection
$ mysql -h {server_ip} -u root -p
Enter password:
Errors
Error: mysql: error while loading shared libraries: libncurses.so.5: cannot open shared object file: No such file or directory
When you run mysql -u root -p.
Solutions
# centos
yum install ncurses-compat-libs
Error: ERROR 1820 (HY000): You must reset your password using ALTER USER statement before executing this statement.
Create a file called kibana.repo in the /etc/yum.repos.d/ directory for RedHat based distributions, or in the /etc/zypp/repos.d/ directory for OpenSuSE based distributions, containing:
You can now install Kibana with one of the following commands:
# older Red Hat based distributions
sudo yum install kibana
# Fedora and other newer Red Hat distributions
sudo dnf install kibana
# OpenSUSE based distributions
sudo zypper install kibana
In this post, I will cover how to configure CORS in a Spring Boot project. If you want to understand how CORS works, you can check out the article Understanding CORS.
Configuring HTTP Request CORS
Controller CORS Configuration
Use @CrossOrigin annotation
Add a @CrossOrigin annotation to the controller class
// no credentials @CrossOrigin @RestController @RequestMapping("/my") publicclassMyController { @GetMapping public String testGet() { return"hello \n" + newDate(); } }
Add a @CrossOrigin annotation to the controller method
@RestController @RequestMapping("/my") publicclassMyController { // no credentials @CrossOrigin @GetMapping public String testGet() { return"hello \n" + newDate(); } }
// with credentials
@CrossOrigin(origins = {"http://localhost"}, allowCredentials = "true")
// or
@CrossOrigin(originPatterns = {"http://localhost:[*]"}, allowCredentials = "true")
Properties of CrossOrigin
origins: by default, it’s *. You can specify allowed origins like @CrossOrigin(origins = {"http://localhost"}). You also can specify allowed origins by patterns like @CrossOrigin(originPatterns = {"http://*.taogen.com:[*]"}).
Add a @CrossOrigin annotation to the controller method or the controller class. It is equivalent to
responding a successful result to the preflight request. For example
HTTP/1.1 204 No Content
Connection: keep-alive
Access-Control-Allow-Origin: https://foo.bar.org
Access-Control-Allow-Methods: POST, GET, OPTIONS, DELETE, PUT
Access-Control-Max-Age: 86400
adding the following headers to the HTTP response headers
// with credentials
response.setHeader("Access-Control-Allow-Origin", "{your_host}"); // e.g. http://localhost or reqs.getHeader("Origin")
response.setHeader("Access-Control-Allow-Credentials", "true");
response.setHeader("Access-Control-Max-Age", "86400");
For ‘DELETE + Preflight’ or ‘PUT + Preflight’ requests, adding header ‘Access-Control-Allow-Origin: *’ to HttpServletResponse does not enable CORS. This will result in the following error
Access to XMLHttpRequest at 'http://localhost:8080/my' from origin 'http://localhost' has been blocked by CORS policy: Response to preflight request doesn't pass access control check: No 'Access-Control-Allow-Origin' header is present on the requested resource.
For requests with custom headers, adding header ‘Access-Control-Allow-Origin: *’ to HttpServletResponse does not enable CORS. This will result in the following error
Access to XMLHttpRequest at 'http://localhost:8080/my' from origin 'http://localhost' has been blocked by CORS policy: Response to preflight request doesn't pass access control check: No 'Access-Control-Allow-Origin' header is present on the requested resource.
Global CORS configuration
WebMvcConfigurer.addCorsMappings
The WebMvcConfigurer.addCorsMappings has the same function as the @CrossOrigin annotation.
allowedOrigins: By default, all origins are allowed. Its default value is *. You can specify allowed origins like "http://localhost".
allowedOriginPatterns: for example, http://localhost:[*], http://192.168.0.*:[*], https://demo.com
allowedMethods: By default, GET, HEAD, and POST methods are allowed. You can enable all methods by setting its value to "GET", "POST", "HEAD", "PUT", "DELETE", "PATCH".
If you request with cookie, you need to add another header Access-Control-Allow-Credentials: true to the HTTP response, and the value of Access-Control-Allow-Origin cannot be *.
Optional HTTP response headers for CORS requests:
Access-Control-Max-Age: 86400: tell the browser to cache the preflight response.
Note
The wildcard * is not supported for the Access-Control-Allow-Headers value.
if the value of Access-Control-Allow-Credentials is true, the value of Access-Control-Allow-Origin cannot be *. The Access-Control-Allow-Credentials: true means request with the cookie.
Preflight requests
A CORS preflight request is a CORS request that checks to see if the CORS protocol is understood and a server is aware using specific methods and headers. It is an OPTIONS request, using three HTTP request headers: Access-Control-Request-Method, Access-Control-Request-Headers, and the Origin header. A preflight request is automatically issued by a browser. If the server allows it, then it will respond to the preflight request with an Access-Control-Allow-Methods response header, which lists DELETE or PUT.
Situations that require a preflight request
DELETE and PUT requests.
Requests with custom headers.
The preflight response can be optionally cached for the requests created in the same URL using Access-Control-Max-Age header. Note that if it is cached, it will not issue a preflight request.
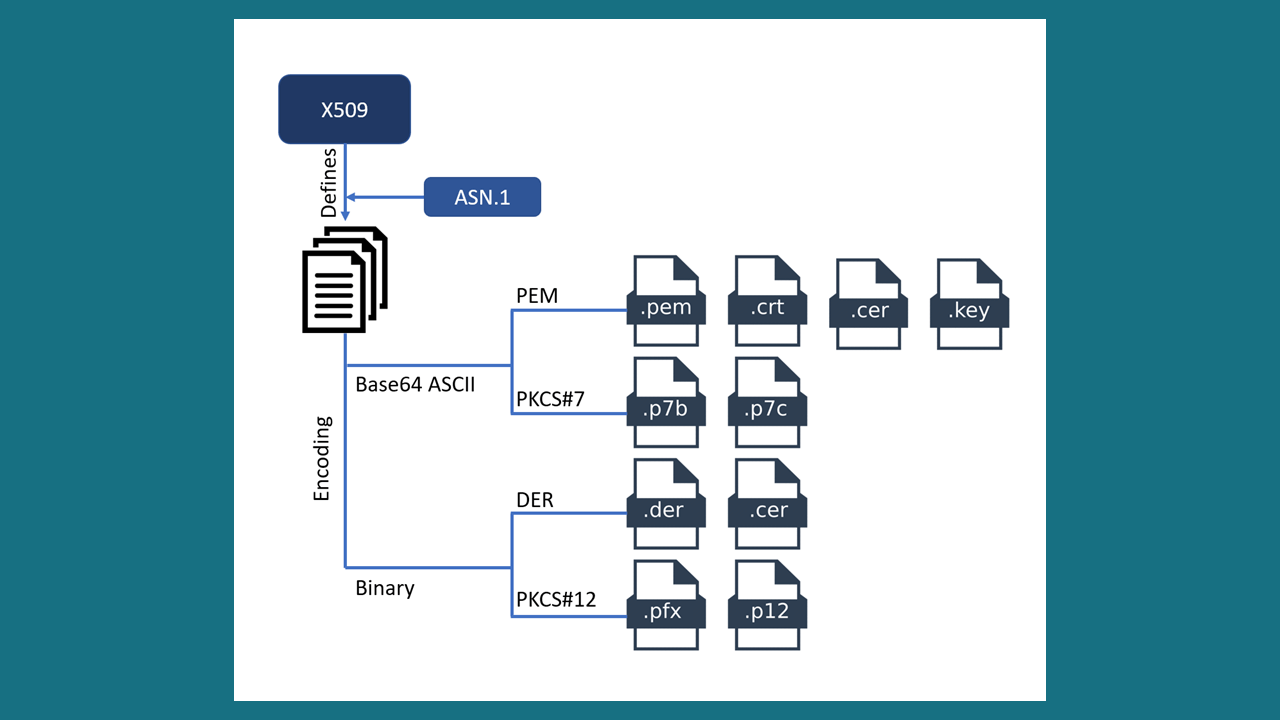
An SSL Certificate is essentially an X.509 certificate. X.509 is a standard that defines the structure of the certificate. It defines the data fields that should be included in the SSL certificate. X.509 uses a formal language called Abstract Syntax Notation One (ASN.1) to express the certificate’s data structure.
There are different formats of X.509 certificates such as PEM, DER, PKCS#7 and PKCS#12. PEM and PKCS#7 formats use Base64 ASCII encoding while DER and PKCS#12 use binary encoding. The certificate files have different extensions based on the format and encoding they use.
The X.509 Certificate’s encoding formats and file extensions
Enter PEM pass phrase:
Country Name (2 letter code) [AU]:
State or Province Name (full name) [Some-State]:
Locality Name (eg, city) []:
Organization Name (eg, company) [Internet Widgits Pty Ltd]:
Organizational Unit Name (eg, section) []:
Common Name (e.g. server FQDN or YOUR name) []:
Email Address []:
-x509: Output a x509 structure instead of a cert request (Required by some CA’s)
-newkey val: Specify as type:bits. (key algorithm and key size). For example, -newkey rsa:4096
-keyout outfile: File to send the key to (private key)
-out outfile: Output file (certificate)
-days +int: Number of days cert is valid for
-*: Any supported digest. For example, -sha256
Optional options
-nodes: Don’t encrypt the output key.
-subj val: Set or modify request subject. (non-interactive). For example, -subj "/C=XX/ST=StateName/L=CityName/O=CompanyName/OU=CompanySectionName/CN=CommonNameOrHostname"
What is your first and last name?
  [Unknown]:  Herong Yang
What is the name of your organizational unit?
  [Unknown]:  Herong Unit
What is the name of your organization?
  [Unknown]:  Herong Company
What is the name of your City or Locality?
  [Unknown]:  Herong City
What is the name of your State or Province?
  [Unknown]:  Herong State
What is the two-letter country code for this unit?
  [Unknown]:  CA
Is CN=Herong Yang, OU=Herong Unit, O=Herong Company, L=Herong City,
ST=Herong State, C=CA correct?
  [no]:  yes
Import
-importcert/-import
// Installing the Self-Signed Certificate on the Client
keytool -importcert -alias alias_name -file path_to_certificate_file -keystore truststore_file
// When your index contains semi-structured data or if you don’t have a domain object definition, you can also read the document as raw JSON data. You can use Jackson’s ObjectNode or any JSON representation that can be deserialized by the JSON mapper associated to the ElasticsearchClient.
SearchResponse<ObjectNode> response = client.search(s -> s
                  .index("indexName")
                  .from(0)
                  .size(10)
                  .sort(so -> so
                          .field(FieldSort.of(f -> f
                                  .field("pub_time")
                                  .order(SortOrder.Desc))
                          )
                  )
                  .query(q -> q
                          .bool(b -> b
                                  .must(m -> m.term(t -> t
                                          .field("name")
                                          .value("value")
                                  ))
                          )
                  )
                  .aggregations("term_aggregation", a -> a
                          .terms(t -> t.field("category"))
                  ),
          ObjectNode.class
  );
Elasticsearch no longer recommend using the scroll API for deep pagination. If you need to preserve the index state while paging through more than 10,000 hits, use the search_after parameter with a point in time (PIT).
In order to use scrolling, the initial search request should specify the scroll parameter in the query string, which tells Elasticsearch how long it should keep the “search context” alive (see Keeping the search context alive), eg ?scroll=1m.
The size parameter allows you to configure the maximum number of hits to be returned with each batch of results. Each call to the scroll API returns the next batch of results until there are no more results left to return, ie the hits array is empty.
Developing new features for existing applications. (refer to the corresponding section)
Note: Development of new software product require a lot of time to optimize the user experience and requirements. Therefore, a lot of code modifications are also required.
Developing new features for existing applications
Functional modules
Understand the software requirements.
Design data models and databases.
API design.
Detailed design.
Write unit tests and code.
Test and Fix bugs.
Modify the code due to the modification of the requirements.
Test and Fix bugs.
Data analysis modules
Understand the software requirements.
Write query statements (SQL, Elasticsearch DSL) for data statistics.
Merge query statements to reduce the number of queries.
API design.
Write the code. Define the data query and response objects and finish the code.
Test and Fix bugs.
Scheduled Tasks
Small functions
Understand the software requirements.
Modify data models and databases. (optional)
API design. (optional)
Detailed design.
Write unit tests and code.
Test and Fix bugs.
Modification of system functionality
Understand the software requirements.
Modify data models and databases. (optional)
Modify API. (optional)
Detailed design.
Modify unit tests and code.
Test and Fix bugs.
Performance Optimization
Positioning problem
Try to find the tuning approach
Software product customization (new features and modifications)
Developing new features for existing applications. (refer to the corresponding section)
Modification of system functionality. (refer to the corresponding section)
Maintain systems and miscellaneous
System troubleshooting and fixing errors.
Update data.
Import data.
Export data.
Third party service renewal.
Integrating Code Libraries
Integrating Third-Party Service API or SDK
Common third-party services
Cloud platform
Storage
OSS
AI + Machine Learning
OCR
Media
Intelligent Media Services
Payment. E.g. Alipay.
Mobile Push notifications. E.g. Jiguang, Getui.
Short Message Service (SMS)
Social. E.g. QQ, WeChat, and Dingtalk open platform, Twitter Developer Platform, Slack API.
Sometimes we need to redirect to our other websites without login again. In addition to single sign-on, we can also add a URL parameter to achieve automatic login.
The Process of Login By URL Parameters
The frontend requests the backend API to get the loginSign string for setting the redirect URL parameters. The redirect URL like https://xxx.com/xxx?loginSign=xxx
The backend constructs the loginSign value
Query the redirected website username and password.
Generate a random string.
Get the current timestamp.
Use the RSA public key to encrypt the username, password, timestamp, randomStr.
Return the loginSign value to frontend.
The client user clicks the redirect URL.
When the target website frontend checks that the loginSign parameter appears on the web page URL, it uses this parameter to request login automatically.
The target website backend decrypts the loginSign value, and checks the username and the password. If they are correct returns an access token, otherwise, returns an error code.
Construct the URL Parameter loginSign
Add a newline \n (ASCII 0x0A) to the end of each parameter.
username\n
password\n
timestamp\n
randomStr\n
timestamp: the request timestamp.
Use the RSA public key to encrypt the string {username}\n{password}\n{timestamp}\n{randomStr}\n
Verify the URL Parameter loginSign
Use the RSA private key to decrypt the loginSign value.
Verify the request timestamp if it’s within 60 seconds of the current time.